Welcome to our guide on how to add contacts and manage them across various devices, from Android Phones to iPhones, iPods, and iPads.
In this digital age, staying connected has become more critical than ever. Whether it’s for personal or professional reasons, having a well-organized contacts list can streamline your communication process and make your life much easier.
Overview: How to Add Contacts
Let’s start with the basics: how to add contacts to your device. Whether you’re using an Android device or an Apple device like an iPhone, iPod, or iPad, the process is relatively straightforward. We’ll walk you through the steps for each platform, ensuring you can effortlessly add new contacts whenever you need to.
The Importance of Maintaining an Organized Contacts List
By keeping your contacts list organized, you can easily find the people you need to connect with, whether it’s a potential client, a colleague, or a friend. Plus, it reflects positively on your professionalism when you can quickly retrieve contact details and reach out promptly.
So, let’s dive into the world of adding and managing contacts, starting with Android devices.
But before we do, have you ever found yourself overwhelmed with managing your contacts? With TimelinesAI’s innovative contact management features, you can effortlessly organize and keep track of all your contacts in one centralized platform.
It’s like having your own personal assistant to help you stay on top of your connections. But more on that later. Now, let’s focus on adding contacts to your Android device.
Adding Contacts on iPhone, iPod, and iPad

Apple’s ecosystem offers various methods for adding new contacts, ensuring you can easily stay connected with friends, family, and colleagues.
Using the Contacts App to Add New Contacts
The Contacts app on your iPhone, iPod, or iPad is your go-to tool for managing your contact list. To add a new contact using the Contacts app:
- Open the Contacts app on your device.
- Tap the “+” icon or the “Add Contact” button.
- Enter the contact’s details, such as their name, phone number, email address, and any other relevant information.
- Once you’ve entered the information, tap “Done” to save the contact.
It’s that simple! Now you have a new contact added to your device, ready to reach out whenever you need to. But what if you’re in a hurry and need to add a contact quickly? That’s where Siri comes in handy.
Adding Contacts via the Phone App Through Contacts, Recents, or Keypad Sections
If you’re using your iPhone to make a call and realize you need to save the contact’s information, you can do so directly from the Phone app. Here’s how:
- Open the Phone app on your device.
- Navigate to the “Contacts,” “Recents,” or “Keypad” section, depending on where you accessed the contact information.
- Tap on the info icon next to the phone number you want to save.
- Select “Create New Contact” or “Add to Existing Contact,” if applicable.
- Enter the contact’s details and tap “Done” to save.
This method allows you to add contacts quickly, especially when you’re in the middle of a call and need to save the information for future reference.
Creating Contacts with Siri’s Assistance and Siri’s Suggestions for New Contacts
Siri, Apple’s virtual assistant, can also help you add contacts effortlessly. Simply activate Siri and say something like, “Add John Doe to my contacts.” Siri will prompt you for any additional information needed, such as phone numbers or email addresses, and then save the contact for you.
Additionally, Siri can suggest adding contacts based on your interactions. For example, if you receive a call or a message from a new number, Siri may suggest adding it to your contacts list. This feature saves you time and ensures you don’t miss out on adding important contacts.
Importance of Entering Essential Information When Creating a Contact
When adding contacts, it’s essential to include all relevant information to ensure you can reach them when needed. Along with the basic details like name and phone number, consider adding additional information such as email addresses, physical addresses, and even notes about how you know the person or any other pertinent details.
Remember, the more information you include, the easier it will be to stay organized and effectively communicate with your contacts.
Speaking of staying organized, have you ever wished for a seamless way to manage your contacts across all your devices? With TimelinesAI’s intuitive contact management features, you can sync and organize your contacts effortlessly, ensuring you never lose track of important connections. But let’s continue exploring how to manage contacts on Apple devices first.
Adding Contacts on Android Phones

Now, let’s delve into adding contacts specifically on Android phones. Android devices offer various methods for adding contacts, catering to different preferences and situations.
When it comes to adding contacts on Android phones, you have multiple options to choose from. Whether you prefer using the Contacts app, the dialpad, or even importing contacts from other sources like your Gmail account, Android provides flexibility to suit your needs.
Steps for Adding Contacts Using the Contacts App:
The Contacts app on Android devices serves as a centralized hub for managing your contacts. To add a new contact using the Contacts app:
- Open the Contacts app on your Android phone.
- Tap the “+” icon or the “Add Contact” button.
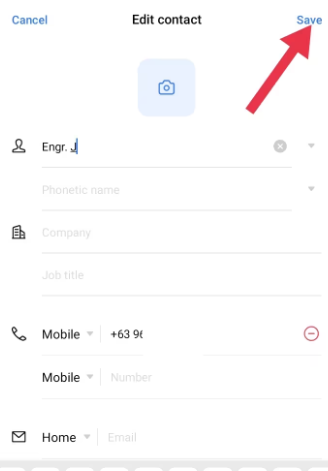
- Enter the contact’s details, including their name, phone number, email address, and any other relevant information.
- Save the contact by tapping “Save” or “Done,” depending on your device’s interface.
It’s a straightforward process that ensures your new contact is seamlessly integrated into your device’s address book.
Instructions for Adding Contacts via the Dialpad:
Sometimes, you may need to add a contact quickly while making a call. Android phones allow you to do this directly from the dialpad:
- Open the Phone app on your Android device.
- Navigate to the dialpad.
- Enter the phone number you wish to save as a contact.
- Tap on the “Add to Contacts” or “Save Contact” option, usually represented by a person icon.
- Enter the contact’s details and save them to your address book.
This method is convenient when you’re in a hurry and need to save a new contact without switching between apps.
Guidelines for Adding Contacts from Call History or Messages:
Another handy feature of Android phones is the ability to add contacts directly from call history or messages. Here’s how:
- Open the Phone app or messaging app on your device.
- Find the call or message from the contact you want to add.
- Tap on the contact’s name or number to view more options.
- Select “Add to Contacts” or “Save Contact.”
- Fill in any missing details and save the contact.
This method streamlines the process of adding contacts you’ve recently interacted with, saving you time and effort.
Managing Contacts
Once you’ve added contacts to your device, it’s crucial to manage them effectively to keep your address book organized and up-to-date. Here are some key aspects of managing contacts on Android phones, iPhones, iPods, and iPads:
Finding and Organizing Contacts Using Search Features
With a growing list of contacts, finding specific ones can become challenging. Android and iOS devices offer search features within the Contacts app to help you quickly locate contacts by name, phone number, or other criteria. Utilize these search functions to streamline your contact management process.
Editing and Updating Contact Information
Contact details may change over time, such as phone numbers or email addresses. It’s essential to regularly review and update your contacts’ information to ensure accuracy. Both Android and iOS devices allow you to edit and update contact information easily, ensuring your address book remains current.
Sharing Contacts Through Various Communication Methods
Need to share a contact with a friend or colleague? Android and iOS devices offer multiple ways to share contacts, such as via text message, email, or even AirDrop (for Apple devices). This feature comes in handy when you want to quickly exchange contact information with others, whether it’s for networking purposes or keeping friends informed.
Quickly Starting Communication with a Contact
Once you’ve added and organized your contacts, initiating communication with them should be seamless. Android and iOS devices allow you to call, message, or email contacts directly from the Contacts app or other relevant apps like the Phone or Messages app. This convenience ensures you can reach out to your contacts without hassle.
The Process for Deleting Unwanted Contacts
Over time, your contacts list may accumulate outdated or unnecessary entries. To declutter your address book, both Android and iOS devices offer the option to delete unwanted contacts easily. Simply locate the contact you wish to remove, select the delete option, and confirm the action. This helps keep your contacts list streamlined and efficient.
Importing and Exporting Contacts

In addition to adding contacts manually, Android and iOS devices allow you to import contacts from external sources or export them for backup or transfer purposes. Here’s how you can manage importing and exporting contacts on your devices:
Importing Contacts from a File or Gmail Account
Android and iOS devices support importing contacts from various sources, including CSV files, vCard files, and Gmail accounts. By importing contacts, you can quickly populate your address book with existing contacts from other platforms or devices, saving you time and effort.
Exporting Contacts to Different Formats or Devices
Similarly, you can export contacts from your Android or iOS device to different formats or devices for backup or transfer purposes. Whether you want to create a backup of your contacts or migrate them to a new device, exporting contacts ensures you retain access to your valuable contact information.
Solutions for Common Issues Encountered During Import or Export
While importing or exporting contacts, you may encounter issues such as formatting errors or compatibility issues. Android and iOS devices provide troubleshooting solutions to address these common issues, ensuring a smooth importing or exporting process.
Advanced Features and Privacy Considerations

As you become more familiar with managing contacts on your Android phone, iPhone, iPod, or iPad, you may explore advanced features and privacy considerations to enhance your experience. Here are some advanced features and privacy considerations to keep in mind:
Using Siri to Manage Contacts on iOS Devices
If you’re using an iPhone, iPod, or iPad, Siri can assist you in managing contacts through voice commands. By simply asking Siri to add, edit, or call a contact, you can streamline contact management tasks hands-free.
Setting the ‘My Info’ Card for Personalized Usage
On iOS devices, you can set a ‘My Info’ card in the Contacts app, which serves as your primary contact information. By configuring this card with your details, you ensure that your contact information is readily available for apps and services that require it.
Adding Relationship Labels to Enhance Voice Command Interactions
To improve the accuracy of voice command interactions with Siri or Google Assistant, consider adding relationship labels to your contacts. By assigning labels like “Mom,” “Dad,” or “Spouse” to contacts, you can use natural language commands to initiate communication or perform actions related to specific relationships.
Understanding and Managing Privacy Settings for Contacts
Both Android and iOS devices offer privacy settings that allow you to control how apps and services access your contacts. It’s essential to review and adjust these settings according to your preferences to protect your privacy and data security.
Controlling Automatic Saving of Contacts to Prevent Unwanted Entries
To avoid cluttering your address book with unwanted contacts, you can control whether new contacts are automatically saved to your device. By adjusting settings related to contact synchronization and automatic saving, you can ensure that only relevant contacts are added to your address book.
Schlussfolgerung
From utilizing the Contacts app to adding contacts via the dialpad and sharing contact information, each platform offers versatile methods to suit your preferences and needs. Additionally, advanced features like voice command interactions with Siri and privacy considerations enhance your contact management experience, prioritizing convenience and data security.
As you navigate the process of adding and managing contacts, remember the importance of keeping your address book organized and up-to-date. Whether you’re importing contacts from external sources or exporting them for backup, maintaining a streamlined contacts list ensures efficiency and accessibility.
- What is WhatsApp Marketing and Is It Legal in India? [2024] - May 16, 2024
- Best WhatsApp Marketing Services and Solutions in Dubai, UAE - May 16, 2024
- How to Add WhatsApp Chat to Your Wix Site? - May 16, 2024


