In the quest for streamlined contact management within Zoho, the integration of WhatsApp country codes emerges as a game-changer. This innovative solution empowers users to automate the process of filtering and assigning contacts, paving the way for increased efficiency and precision. Explore how you can “Automatically Filter and Assign Contacts in Zoho” through the intelligent categorization of contacts based on their WhatsApp country codes. Zoho and WhatsApp integration not only enhances workflow automation but also allows you to focus on meaningful interactions and strategic decision-making.
In this guide, we delve into the steps and benefits of this transformative approach to contact management, offering a comprehensive understanding of how to enhance your Zoho experience with automated filtering and assignment based on WhatsApp country codes. Learn more about WhatsApp and Zoho integration in our Playbook.
1. Click on Add Workflow

2. Click on Add first step…

3. Type “Webhook”

4. Click on Webhook…

5. Check and place your desired Parameters on Webhook

6. Click on the small plus icon beside Webhook to add a new node.

7. Type “IF”

8. Click on “IF”
The “IF” node will allows us to define conditions based on the values of previous nodes here in the workflow. Depending on whether the condition is true or false, the workflow will follow different paths or branches. This is useful for creating more dynamic and flexible workflows that respond to different situations.
9. Click on Add Condition

10. Click on String

11. Under Value 1, click on “Expression” and enter your Variable from Webhook.
Expressions are like magic commands that help you change and work with your data in your workflows. You can use them to create new data, pick out specific pieces of information, do math, and lots of other things.
These expressions are most often used in special places in your workflow, like when you want to change data in a “Set” step or make decisions in a “Conditional” step. It’s like having a toolkit to make your data do exactly what you want.
12. Type “True”

13. An IF node has now been added on your Canvas. Next we’ll add a helper. To do so, click on the small plus icon beside IF under False.

14. Click on Helpers…

15. Click on No Operation, do nothing…
The “Helpers: No Operation” node is a tool that will help us maintaining our workflow structure and planning, ensuring that even if a node doesn’t perform any operation, we can still include it in our workflow for clarity.
16. The No Operation, do Nothing node is now added to our workflow. Next, we’ll add a Switch node. You can do this by clicking on the small plus icon besides the “true” IF node.

17. Type “Switch”

18. Click on Switch…

19. Click on the dropdown button under Data Type

20. Under Data Type, click on String.

21. Under Value 1, click on “Expression” and enter your Variable from Webhook.

22. Click on Add Routing Rule

23. Under Operation, we’ll select “Start With”

24. Click on Starts With

25. Under Value 2, you may add any desired value for this one.
As an example here, I decided to use the value of “+996”. This will allow the workflow to determine if the senders phone number starts with a certain code. From there, it will route it to various flow output branches.
26. Next will add another Routing Rule. Click on Add Routing Rule

27. Click the dropdown button under Operation

28. Select Starts With

29. Under Value 2, you may add any desired value for this one.

30. Type “1”

31. Next, we’ll add a routing path for all the value that will pass the routing rule 0 we did earlier. Click on the small plus icon besides “0” under your Switch node.

32. Type “HTTP Request”

33. Click on HTTP Request…

34. Enter the URL on where the node will make the request to

35. Click on the dropdown button under Authentication

36. Click on “Predefined Credential Type”

37. Type “Zoho OAuth2 API”

38. Click on Zoho OAuth2 API

39. Under Credential for Zoho OAuth2 API, click on Select Credential

40. Click on Zoho accout

41. Next, we’ll add another IF node. Click on the small plus icon beside HTTP Request

42. Type “IF”

43. Click on IF…

44. Click on Add Condition

45. Click on String

46. Under Value 1, click on Expressions and enter the value to compare with the second one.

47. Click on the dropdown icon under Operation

48. Click on “Is not Empty”

49. We can also proceed renaming our IF node by clicking on the small pen icon beside the node’s title. From there, type “Checking if Leads exists in Zoho CRM”

50. Click on Rename

51. Next, we’ll add another HTTP Request node under the true value for our IF node.

52. Type “HTTP Request”

53. Click on HTTP Request…

54. Click on the dropdown button under Method

55. Click on PATCH
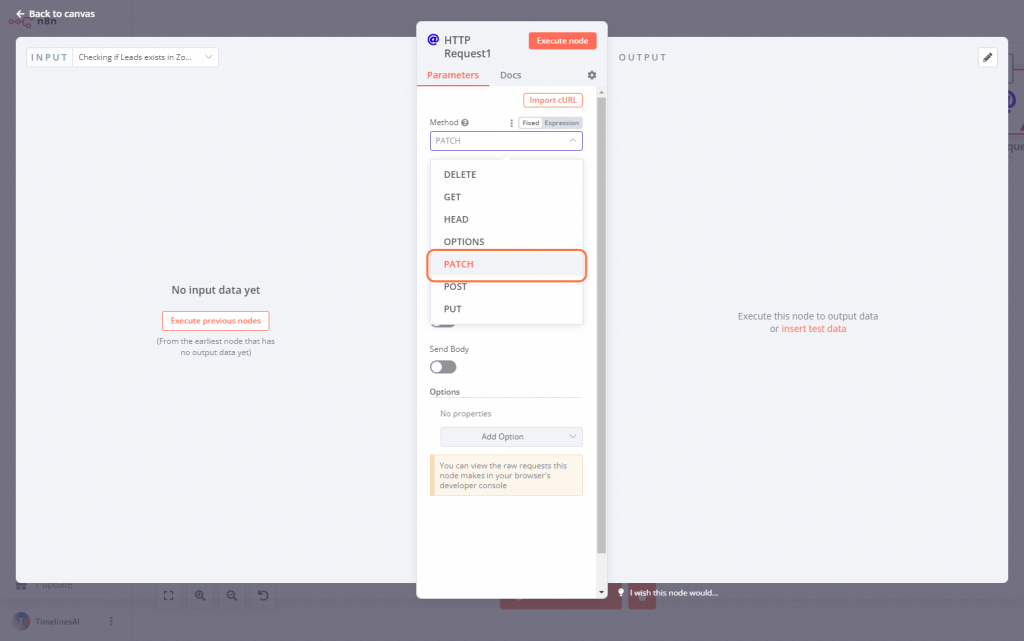
56. Enter the URL on where the node will make the request to

57. Next, we’ll add another node under the False route of our IF node.
Here, we’ll add a Zoho node that would route false conditions from the workflow to add a lead first in Zoho.
58. Type “Zoho CRM”

59. Click on Zoho CRM

60. Type “Create a lead”

61. Click on Create a lead

62. Fill out the Parameters for your Zoho CRM Node

63. We can also proceed in renamin this node. Here, I’ve chosen to rename it to “Create Lead”

64. Click on Rename

65. From there, we’ll duplicate the node that will allow us to assign the lead to an agent and add it beside the Zoho CRM we’ve just created.

66. Drag the duplicated Node beside the Zoho CRM and connect them afterward.

67. Next, we’ll add another routing path for our Switch.
This routing path will lead all “1” conditions in sending a welcome message in Spanish.
68. Type “HTTP Request”

69. Click on HTTP Request…

70. Click on the dropdown button under Method

71. Click on POST

72. Under URL, enter the URL on where the node will make the request to

73. Toggle the button for Send Headers

74. Under Header Parameters > Name, enter your desired name. Here, I’ve chosen to type “Authorization”.
 Name, enter your desired name. Here, I’ve chosen to type "Authorization".”>
75. Under Value, enter your Timelines AI Bearer code.

76. You can also proceed in renaming this node. Here, I’ve chosen to rename it to “WhatsApp: Welcome message in Spanish”

77. Click on Rename

78. Next, we’ll add another HTTP Request node that will allow the workflow to assign a label. You can do this by clicking on the small plus icon beside our “WhatsApp Welcome message in Spanish” HTTP request node.

79. Type “HTTP Request”

80. Click on HTTP Request…

81. Click on the dropdown button under Method

82. Click on PATCH

83. Under URL, enter the URL on where the node will make the request to

84. Your Workflow is now completed.

- You can connect your leads, deals, contacts, etc., in Zoho CRM with the right person in Timelines. For instance, if someone else becomes the owner of a deal in Zoho, the person in charge of the WhatsApp chat in TimelinesAI will also change. To learn how to do this, check out this link on setting up a Zoho Workflow rule.


