How Can We Help?
Zapier Automation: HubSpot and WhatsApp
You can integrate HubSpot with WhatsApp on TimelinesAI, thanks to our Native Zapier Integration. Zapier will allow you to connect HubSpot with TimelinesAI, so you can do different actions based on triggers set on Zapier. This will let you send automated messages to your contacts on WhatsApp whenever a change occurs on HubSpot, like creating or updating a Deal.
- Native Zapier integration is available on all TimelinesAI plans.
- You can try it on a Free Trial right now! No credit card or additional setup is required, works with all WhatsApp numbers.
Learn more about the WhatsApp and Zapier Integration here.
In this article, we’ll go over the creation of Zaps that will cover:
- Sending a message to a new chat in TimelinesAI when a new deal’s created in HubSpot
- Sending a message to an existing chat in TimelinesAI when a new deal’s created in HubSpot
These are basic Zaps that you can create for yourself. We’ll go over the creation of both, so we can convey the general process involved but, keep in mind that you can create Zaps with different triggers and actions for HubSpot/TimelinesAI, according to your needs. We’ll also leave templates of these Zaps for you to try on your end.
Send a Message to a New Chat in TimelinesAI when a New Deal is Created in HubSpot
Step #1: Create your Zap
Log into TimelinesAI, HubSpot, and Zapier.
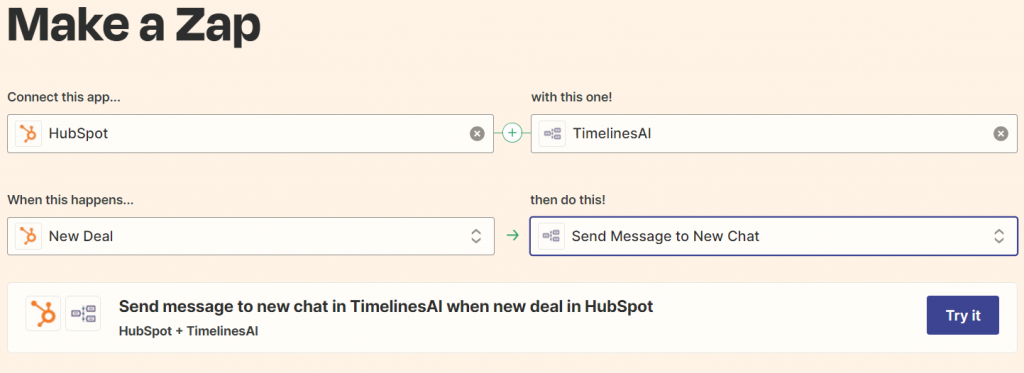
Then, on Zapier, go to the Dashboard and refer to the “Make a Zap” section. Here, you should set up your Zap like this:

After that, please click on “Try it”.
Note: If you haven’t done it already, Zapier will ask your permission to access information from your HubSpot account. Once you approve it, Zapier will proceed and gather data from your HubSpot account. You must also integrate TimelinesAI with Zapier. You can follow these quick steps, in order to have everything set for this and future Zaps that you create:
- Go to TimelinesAI and click on the “Zapier” section
- Make sure to click on the “Generate new token” button. This will provide you with a token that Zapier will require, to integrate with your TimelinesAI account:

- Then, go back to Zapier and continue the process by pasting that token into this text box:

Step #2: Editing the Trigger
Here you’ll be editing your trigger (Send message to new chat in TimelinesAI when new deal in HubSpot) by completing the following details:
- Choose account: You’ll be able to select your HubSpot account here by clicking on the “Connect a new account” button – by previously logging into HubSpot, your account will automatically be loaded by Zapier – it’ll ask for your permission to access it and then, the account will be available to use
- Test trigger: In this section, you’ll be able to add properties to retrieve from HubSpot – we recommend leaving this blank, as we’ll be working with new deals. However, you may add more properties, if you see this necessary.
Zapier will load the newest Deal in your HubSpot account – if it doesn’t load any Deal, you may create a new one and proceed, as Zapier requires this is just for testing purposes.
Step #3: Editing the Action
Now, you’ll proceed to work on the Action that’ll follow the Trigger (Send message to existing/new chat in TimelinesAI when new deal in HubSpot).
Given how HubSpot works within Zapier, there are some extra steps that must be taken before working on the final action on TimelinesAI. You’ll need to set a couple of “pre-actions”, in order for Zapier to retrieve the information, like the contacts, that you’ll need for the message that you’ll be sending on TimelinesAI. We’ll go over these here:
Add an Action to your Zap 1/2: Find Associations within your Deal:

Below the trigger we worked with, you’ll see a “+” button, which will allow you to add an action. Here, you will see a window that will ask you for the application where the action will take place. Make sure to search for HubSpot; once you find it and select it, you’ll see a new section open here.
Now, within the “Event” drop-down, make sure to select “Find Associations” and then, click on “Continue”. Then, you must select your HubSpot account from the drop-down; after selecting your own HubSpot account, click on “Continue”.
Next, Zapier will present you with the “Set up action” section, which will contain the following fields:
- Task halting strategy: Make sure to pick “Halt task if associations not found”
- The ID of the object you want to search the association: Here you’ll put the Deal’s ID, which you’ll be able to pick from the options provided in this drop-down field. The option will read something like “1. ID: 1234567890”
- The type of the object you want to search the association: Select “Deal”
- Number of association types you want to search: Choose “One”
- Type of the objects the from object is being associated with: Here you’ll pick “contact”
- Should this step be considered a “success” when nothing is found?: Lastly, make sure to select “No”
Once you’re done, you may proceed and click on “Continue” – you’ll then be taken to the final section; “Test action”. Here, once you proceed with the test, you’ll see data indicating that the contact has been found within your Deal. The system will provide you with the contact’s ID on HubSpot:

Add an Action to your Zap 2/2: Getting the Contact Information from HubSpot:
Now that we have found the Contact that’s associated with your Deal, we can get all that contact’s details, which will help us later on.
Proceed to create another action, by clicking on the “+” button, which is in the middle of your previously created action and the final action. You may refer to the steps we discussed before in order to create the action here.
After creating the action for HubSpot, you must select “Get Contact” from the “Event” drop-down menu and click on “Continue”. You’ll then select your HubSpot account again and click on “Continue”. We’ll move to the “Set up action” section, where you’ll see these fields:
- Contact ID: Make sure to select the previous action we worked on before (Find Associations in HubSpot), as shown here:

- Additional properties to retrieve: Search for the option “Contact information: Calculated Phone Number in International Format”
Once you’re done, you may continue and proceed to test the action. The system will provide you with the contact information and, more specifically, the phone number in international format.
Action: Send Message to Existing/New Chat in TimelinesAI when New Deal in HubSpot
After working on the previous “pre-actions”, we are now ready to continue with the last step, which will be the direct action after the trigger. Here we’ll set the action so you can send a message to a new chat on TimelinesAI.
- Note: Sending a message to an existing chat on TimelinesAI requires an additional step, which will be discussed in detail after we go over sending a message to a new chat.
- Event: Here you’ll double-check whether you want to send a message to a new chat or an existing one. Keep in mind that the settings for both scenarios vary; refer to the 3rd point for more details.
- Choose account: Here you’ll select your TimelinesAI account(workspace), which will be the one that will be used to send the message. Keep in mind that Zapier may ask you for a token, which you can always get from TimelinesAI by going to the Zapier section and then, clicking on the token that you have generated there – it’ll be automatically copied to your clipboard, so you can then paste it within this section on Zapier.
- Set up action: You can enter the details of your message within this section. The fields that you can work with will vary depending on the kind of action you want to make; sending a message to a new chat or an existing chat. We’ll go over both scenarios here:
Sending a Message to a New Chat on TimelinesAI:
- WhatsApp Account: You can choose your WhatsApp account here, the one that you have connected to TimelinesAI
- Phone number: Here you may select the value you want to use, like “Deal information”

- Message text: The actual body of your message; you may use the variables that will be available for you, to personalize your message:

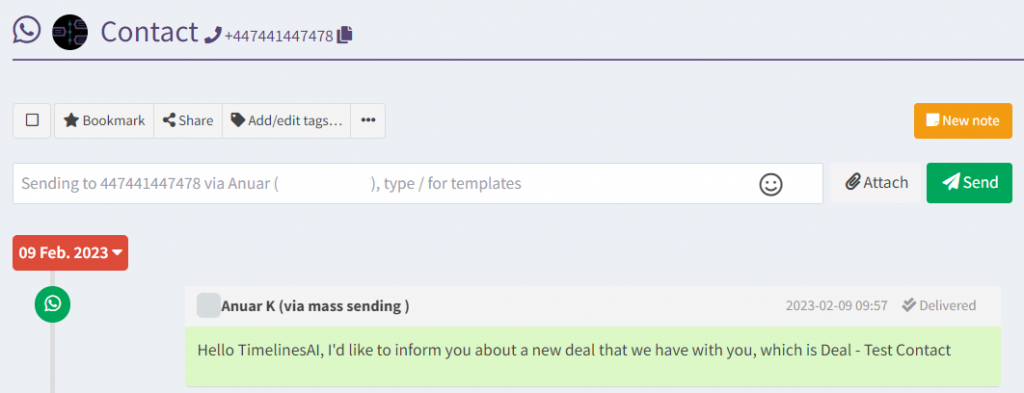
Your message will look like this on TimelinesAI – keep in mind that this message will be the same on WhatsApp as well:

Sending a Message to an Existing Chat on TimelinesAI:
When it comes to sending a message to an existing chat on TimelinesAI, there’s an extra step that you must take. You have to add another action to your Zap, just before the final action (sending a message to an existing chat on TimelinesAI).
Make sure to add a new action by clicking on the “+” button, which is between your previous and last actions. Then, select TimelinesAI as the application for this action; the Event should be “Find Chat”. Then, make sure to select your TimelinesAI account and click on “Continue”.
Within the “Set up action” section, you’ll see the following:
- Name: You may leave this section blank; however, you can select the contact’s name only if you’re sure that the contact’s name is the same on HubSpot and TimelinesAI
- Phone: This is crucial – click on the “Get Contact in HubSpot” and then, select “Contact Information: Phone Number”. This will allow the system to get the chat belonging to that phone. It is imperative that both, the phone and name are the same on TimelinesAI and HubSpot
- Chat Id: You may leave this blank
- Should this step be considered a “success” when nothing is found?: No
Proceed to the test once you are done.
Lastly, we can work on the final action – sending a message to an existing chat on TimelinesAI. Within the last action, you’ll see the following fields in the “Set up action” section:
- Chat Id: You may select the ID from the “Find Chat in TimelinesAI” option
- Whatsapp Account Number: Your WhatsApp account, the one you have connected to TimelinesAI
- Whatsapp chat jid: A unique identifier that you can add from the “Find Chat in TimelinesAI” option as well
- Message text: The body of your message – Feel free to add the variables available within this section as shown before, so you can send a customized message to your contact
And that’s it! You have successfully integrated HubSpot and TimelinesAI(WhatsApp) via Zapier. You can check the templates that we have available here:
- Send a Message to a New Chat in TimelinesAI when you get a New Deal in HubSpot
- Send a Message to an Existing Chat in TimelinesAI when you get a New Deal in HubSpot
Keep in mind that you may create more Zaps for HubSpot and TimelinesAI, where you can change the triggers and actions, depending on what you aim to achieve.
If you have any questions, feel free to contact us via our Chat Support or by sending an email at hello@timelines.ai, we’d be more than happy to provide further assistance!
- Send automated WhatsApp messages when any column value changed in board in monday.com - March 15, 2024
- Stay Informed on the Go: Set Up Real-Time Updates from Your Monday.com Board to WhatsApp - March 14, 2024
- Streamline Team Communication: Automated WhatsApp Alerts for New Monday.com Board Items - March 14, 2024